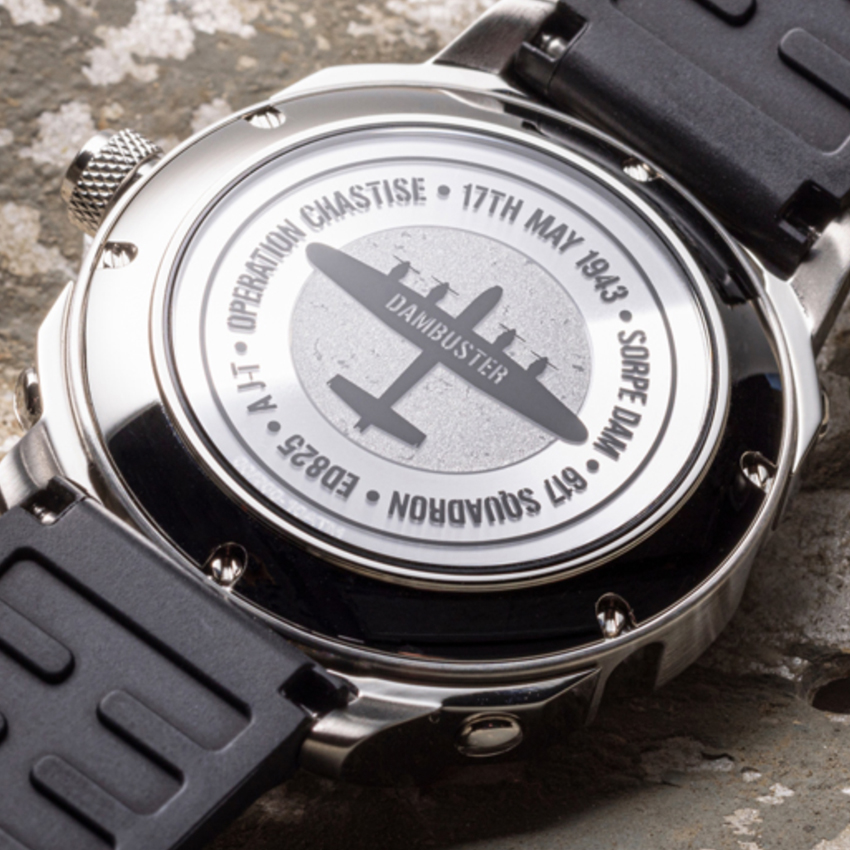
World class Dambuster ED825 model by Spencer Pollard

As part of retelling Operation Chastise and the launch of the Zero West Dambuster watch range, we commissioned world-renowned model maker Spencer Pollard to reproduce Lancaster ED825 in infinite detail. Not only would this test his many years of experience but would need an enormous amount of research to create a model that was historically accurate as these were no normal Lancaster bombers….around 150 hours later and I think the results speak for themselves. Below Spencer takes on the fascinating journey on how he created the model with the resulting photographs a testament to the painstaking detail.
Underside of Dambuster model
Man holding Dambuster model in zero west studio
Artist paints and brushes

DAMBUSTER ED825

Though I spend my life building models for a living and then writing about those projects for various publications, I’m rarely asked these days to build specific models for private clients. It was then with some surprise, that I was asked in the summer of 2021 to take on a commission that would not only stretch my skills, but would do so as the result of perhaps the most important single model I’ve ever tackled. Not only would the model be large and intricate, its finish would be one that involved many cutting-edge techniques. Friends would be asked to supply items I didn’t have. And then, as a final flourish, the decal artist for none other than Airfix, would be brought into play to create painting masks that would enable me to airbrush markings onto the model that in turn, made the whole thing a true, one-off.

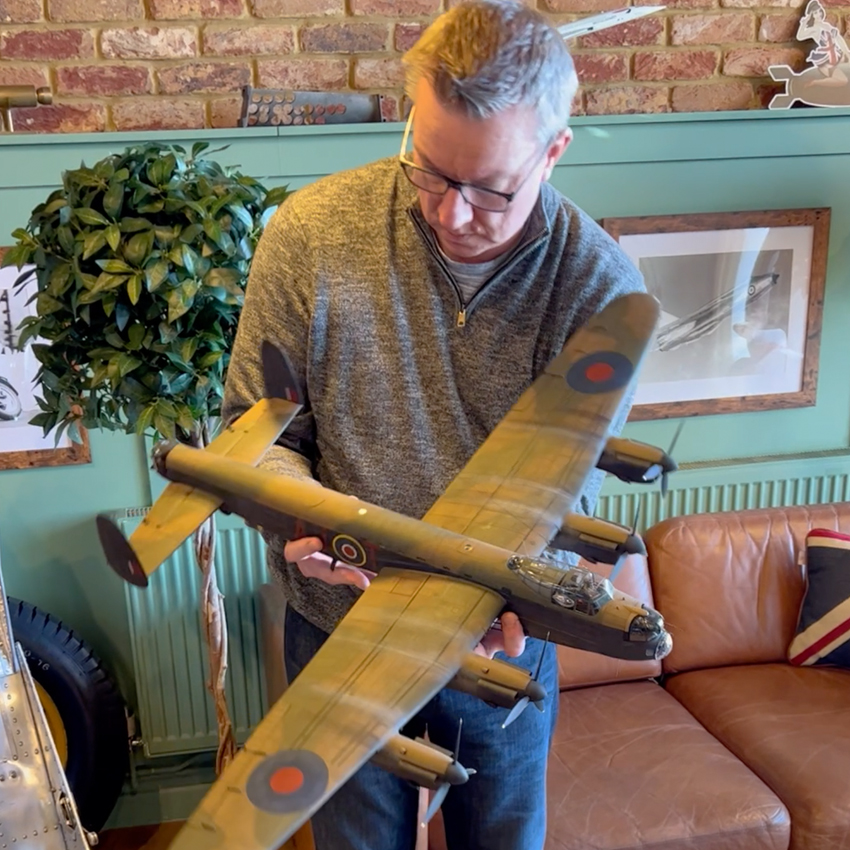
I guess many of you will have built plastic kits over the years, boxes full of intricate parts that you glue together and then paint the results. Most of the projects will have been finished as directed in the kit, instructions and decals combining to create a model that many others will have completed in a not too dissimilar fashion: glue, paint, decals and then with a bit of luck, display. How many though will have had the chance to build something, that though assembled from a readily available kit, is utterly unique? That was the chance I had when I was asked to build an Avro Type 464, serial number ED825, or more pithily for those less than au fait with War Department nomenclature: a Dambuster Lancaster.

Unpainted shell of Dambuster model
Unbeknownst to me at the time, Zero West were planning a new Dambuster watch — or rather, watches — that would memorialise the aircraft that took part in Operation Chastise, the dams raids that would make Barnes Wallace and his revolutionary ‘Bouncing Bomb’, famous. Each watch would feature a small ingot of metal that had formed part of one of the bombers, ED825, a machine that would survive the raid, but not the war, crashing not long before hostilities ended in 1945. My role would be to build a model of ED825, one that was big enough to show off all of the details found on the real aircraft and then sufficiently impressive that it could form the centrepiece of any display in which the watches were shown off. Simple, eh? Well, yes and as it turned out on occasion, no…
Close up part of Dambuster model
Wing part of Dambuster model
Close up of Dambuster model
The first port of call was a suitable kit. Over then years there have been many kits of the Lancaster, but it is only recently that a large-scale 1/32 offering has been made available. Released by Hong Kong Models (a progressive Asian concern that have made a name for themselves over recent years, producing large-scale kits of bombers such as the B-17 and Lancaster) the kit was large, involved and thanks to a variant-specific release that replicated a number of ‘Dam Busters’, buildable without too much ion the way of modification. The brief though would become more specific as the project developed, a wheels-up display being just one factor to take into account, a request that would involve the sourcing of crew figures, something I both didn’t have and knew would be difficult to fit in a kit that was not designed to house such things.
Shell of Dambuster model partially painted
The kit, once built, is massive. With a wingspan that touches a little under one metre, and a length little shorter, this build would test the size of both my construction and painting benches, as well as my spray booth, the dimensions of which can be measured in inches, rather than feet. Indeed, such was its size once built, it spent much of its days on the bed in the spare room, the soft surface of the duvet and a general lack of use, ensuring that the model remained safe and sound as construction and painting progressed. I do wonder as I’m writing this what would have happen if that room had not been available, because there was certainly no space in my studio to house such a large replica!
Interior parts of Dambuster model
Though ED825 was a fairly stock machine, it did differ in details from the other Dambusters. Used as a trials aircraft, it only came into use on the night of its mission when one of the other aircraft became unserviceable. Having had no plans to use it, ED825 missed a number of important features that the crews had no time to fit. Heading this list of items where the fore and aft searchlights, simple visual aids that ensured the aircraft were at the necessary height of 30ft on the way to releasing their weapons. I was therefore instructed to leave those items off the model, as was I to ensure the undercarriage was retracted, specific aerials were in place and then find sufficient crew that if anyone were to take a closer look, you’d see some life under the capacious canopy and inside the fore and aft gun turrets. Ideas in place, most of what I needed, sourced, I set to work…
Close up of dials of Dambuster model
Close up of Dambuster model wing
Close up of dials in Dambuster model

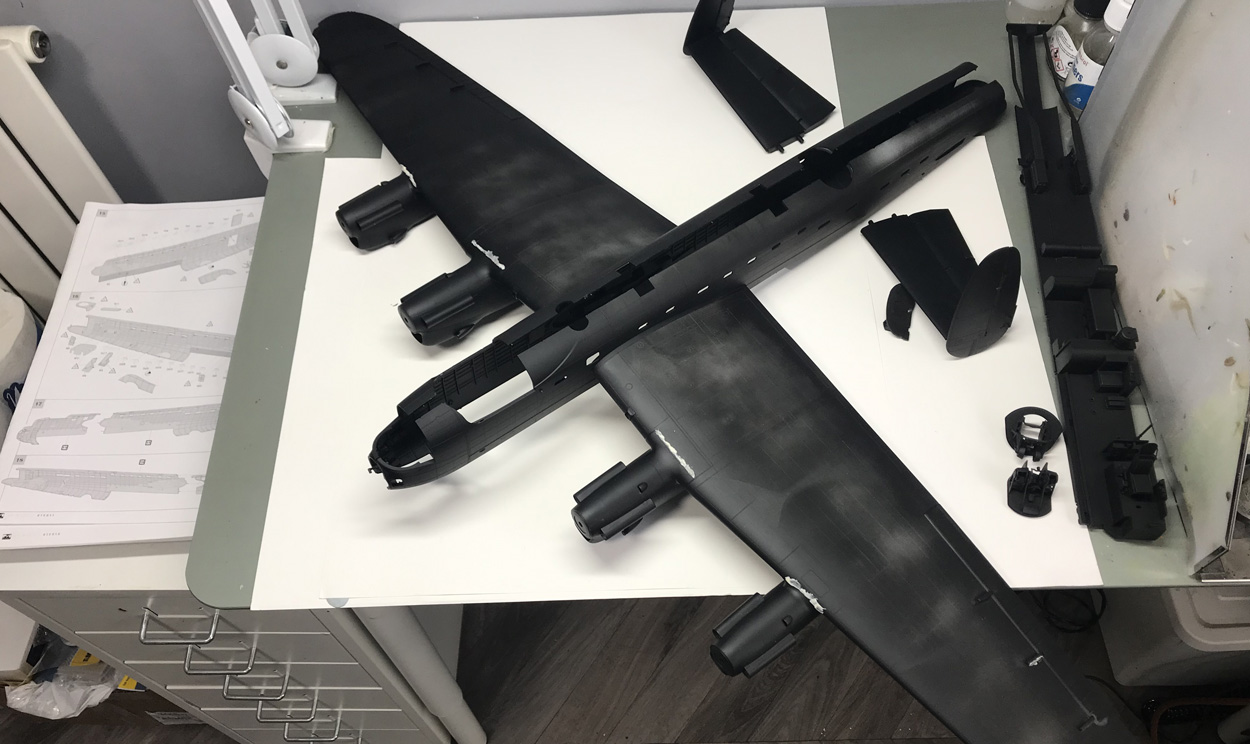
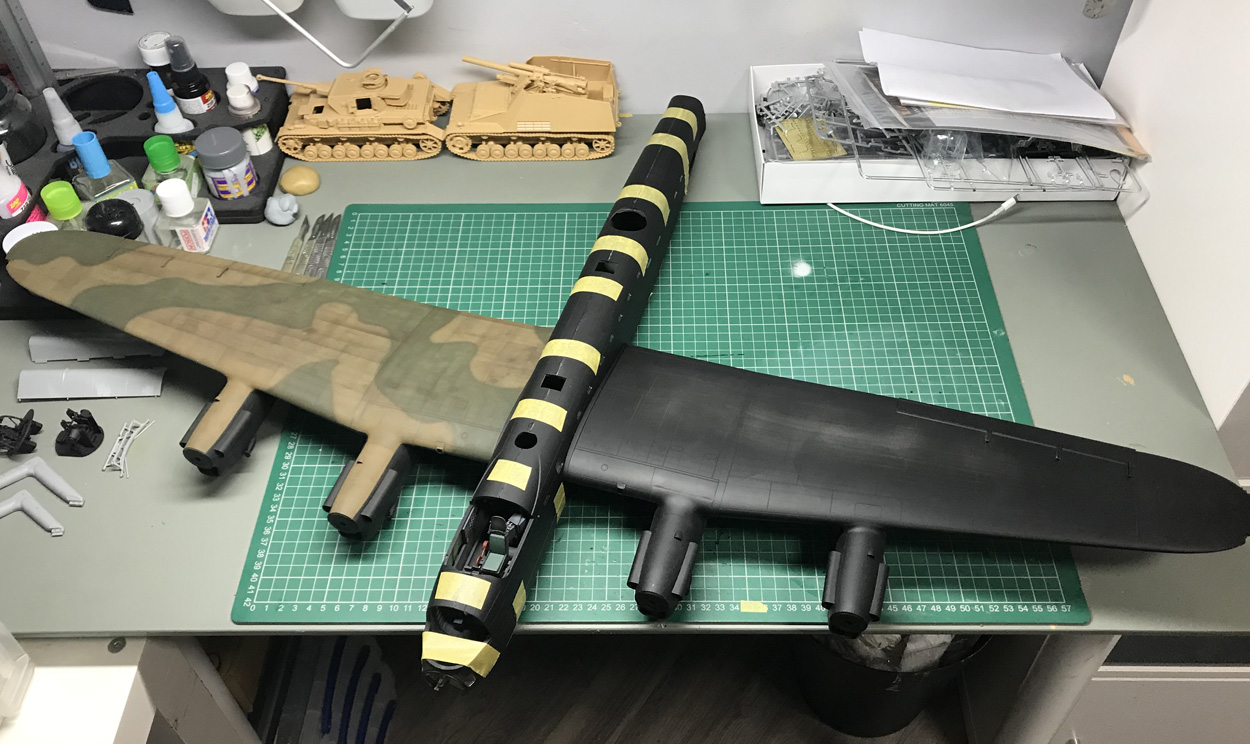
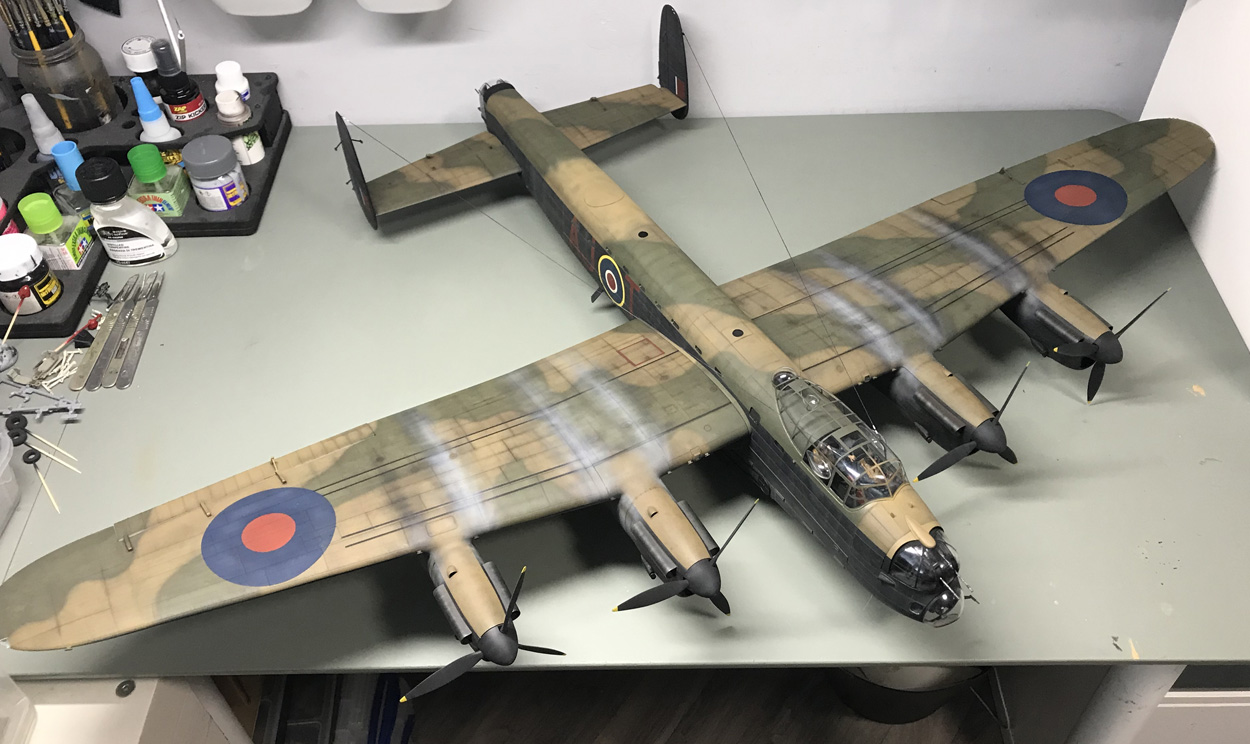
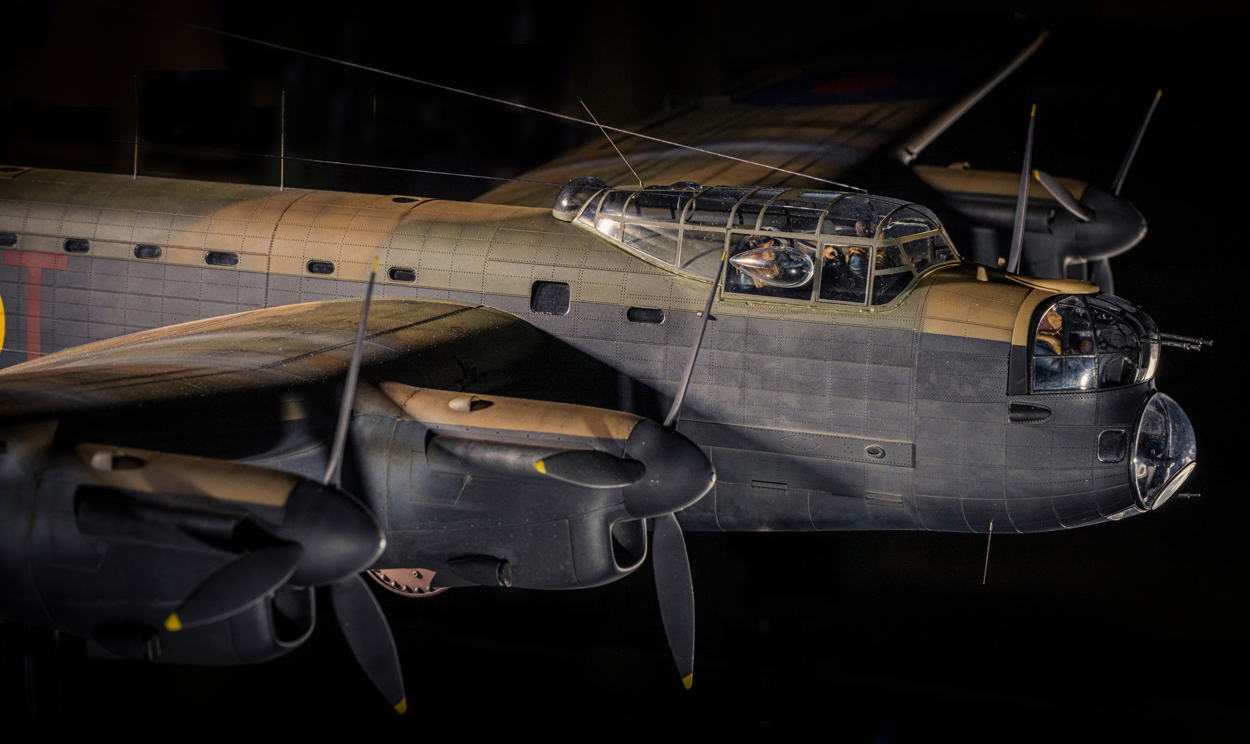
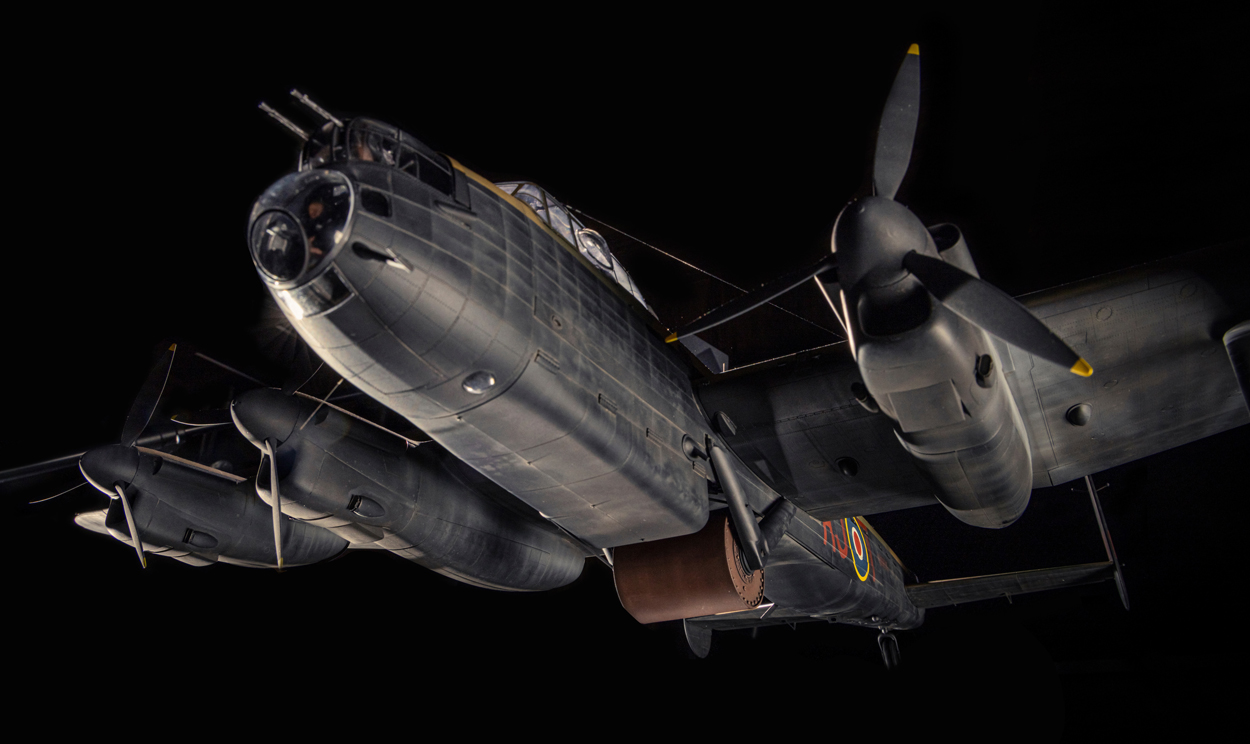
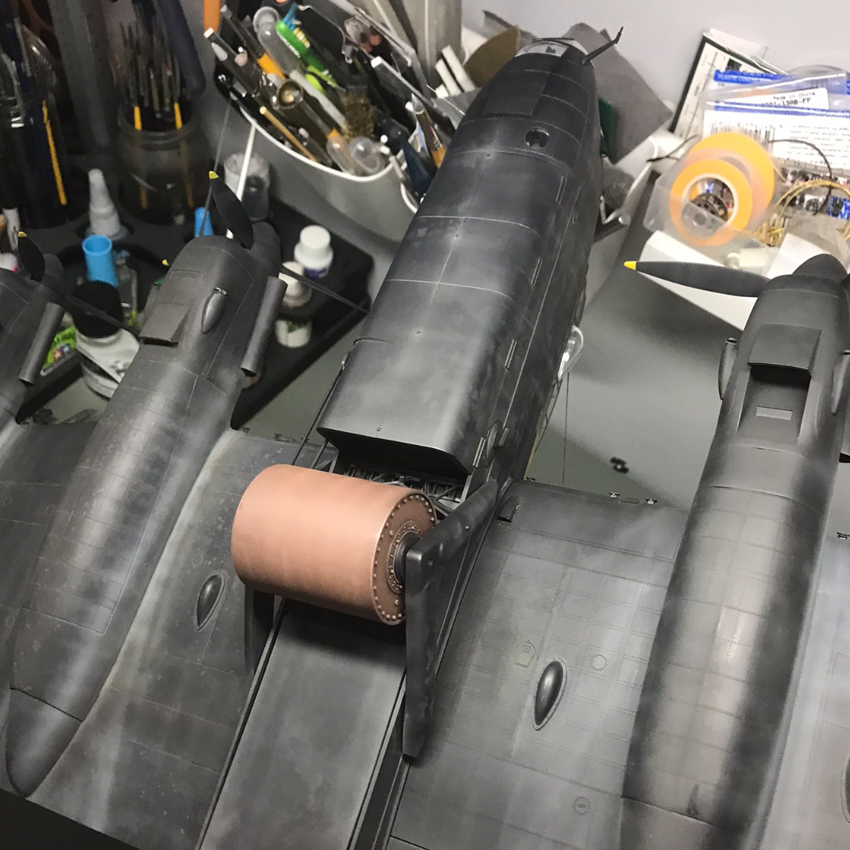
Despite the size of the model, construction, was not difficult, just a little ungainly. Large parts for the fuselage and wings caused issues with access around my workbench which is set-up for smaller models, but nothing that couldn’t be dealt with, with a little care. Graham’s plans for the model involved  –– initially –– displaying it hung from the room, so my first thoughts were to lighten it as much as possible. Anything within the fuselage that couldn’t be seen for instance were removed, all of the engines left out, the undercarriage and wheels consigned to the bin. It was those items and the planning that went into dealing with the model without them, that took up the first few hours of the build, before assembling as much as I could ready for painting. As a professional, this is always something that must be done. Time is never on my side, so anything that I can complete in large sub-assemblies will drag the time down to a more appropriate amount. That way I have more of the allotted schedule to deal with what I need to work on, and don’t get sidetracked with superficial issues that won’t be seen either in, or on, the completed model.

Close up of interior of Dambuster model

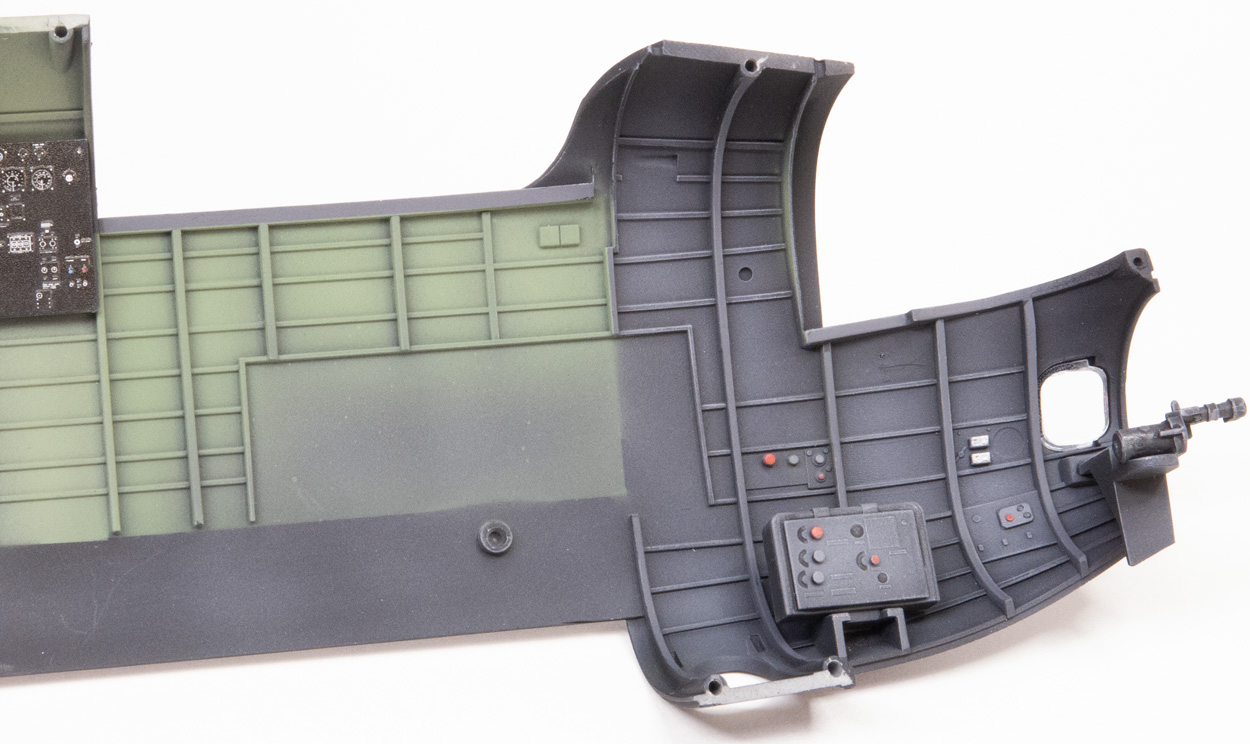
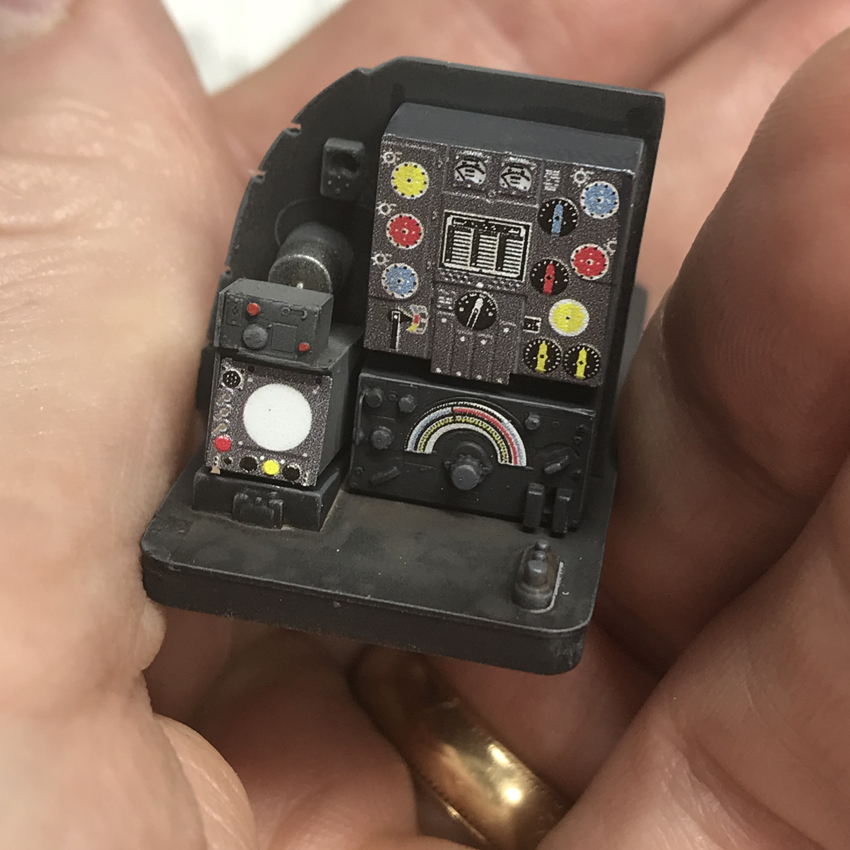
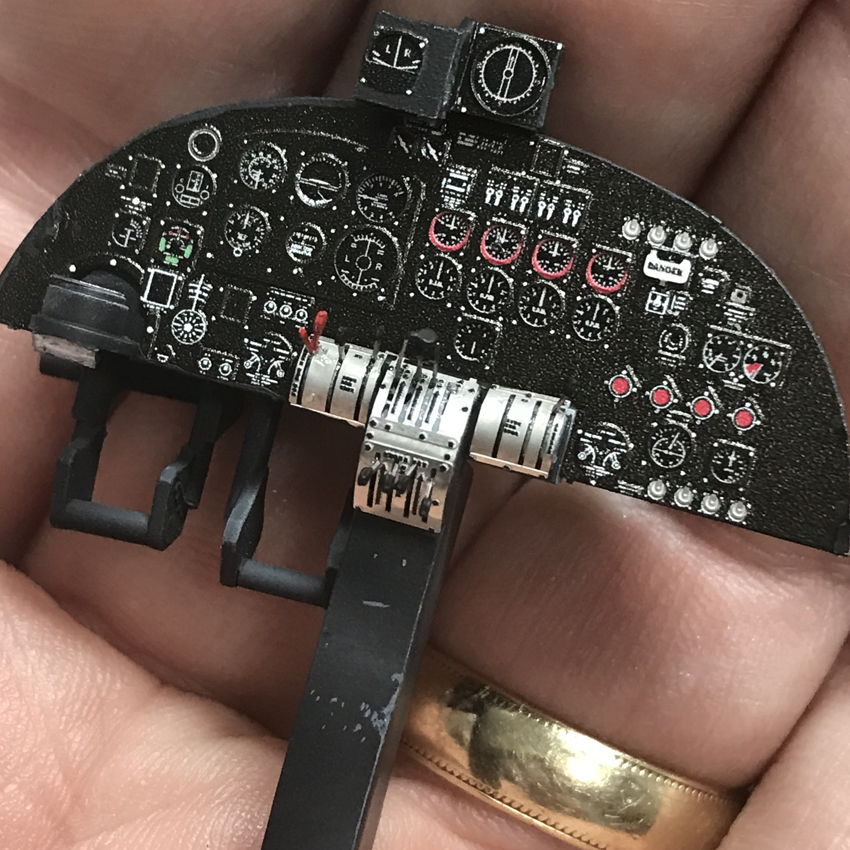
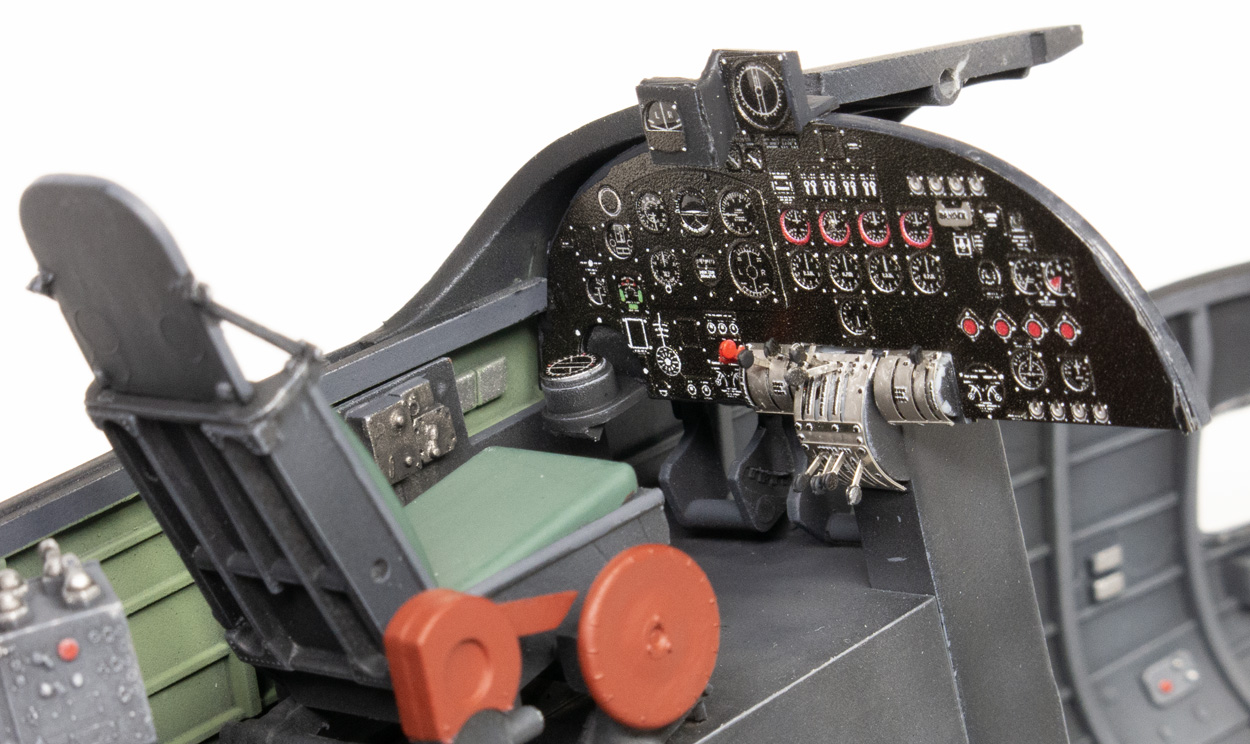
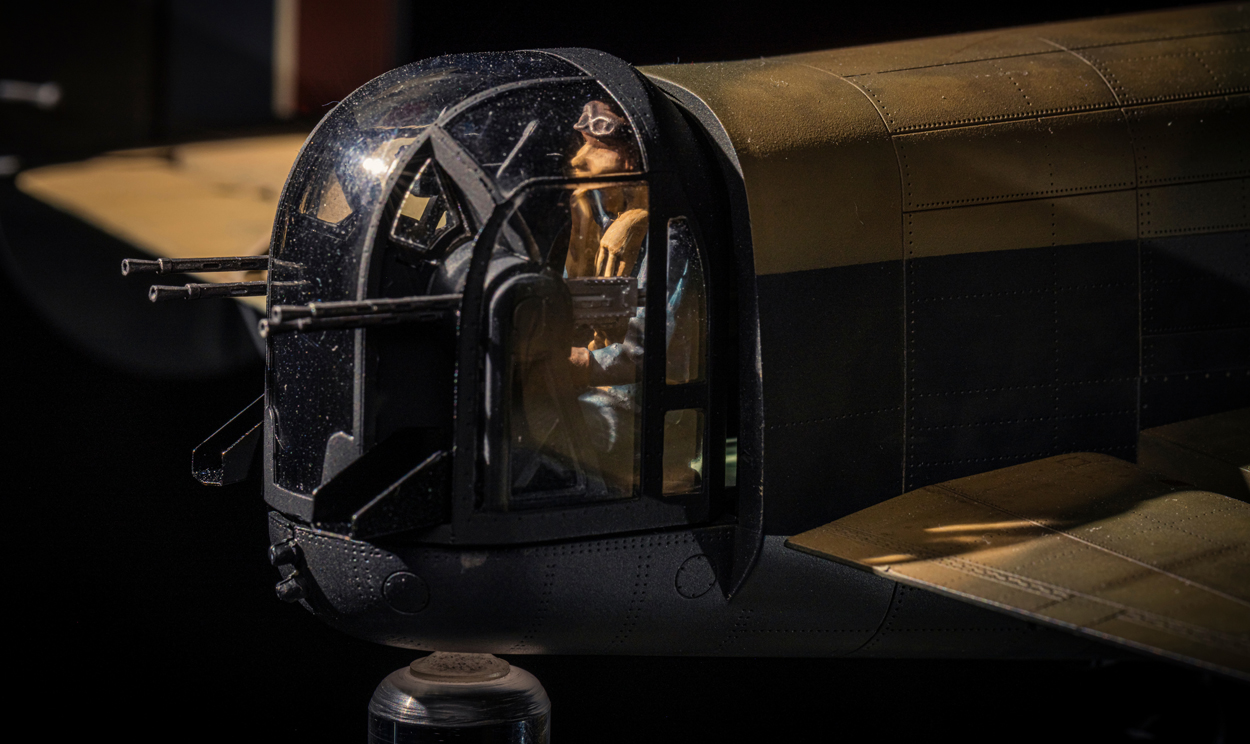
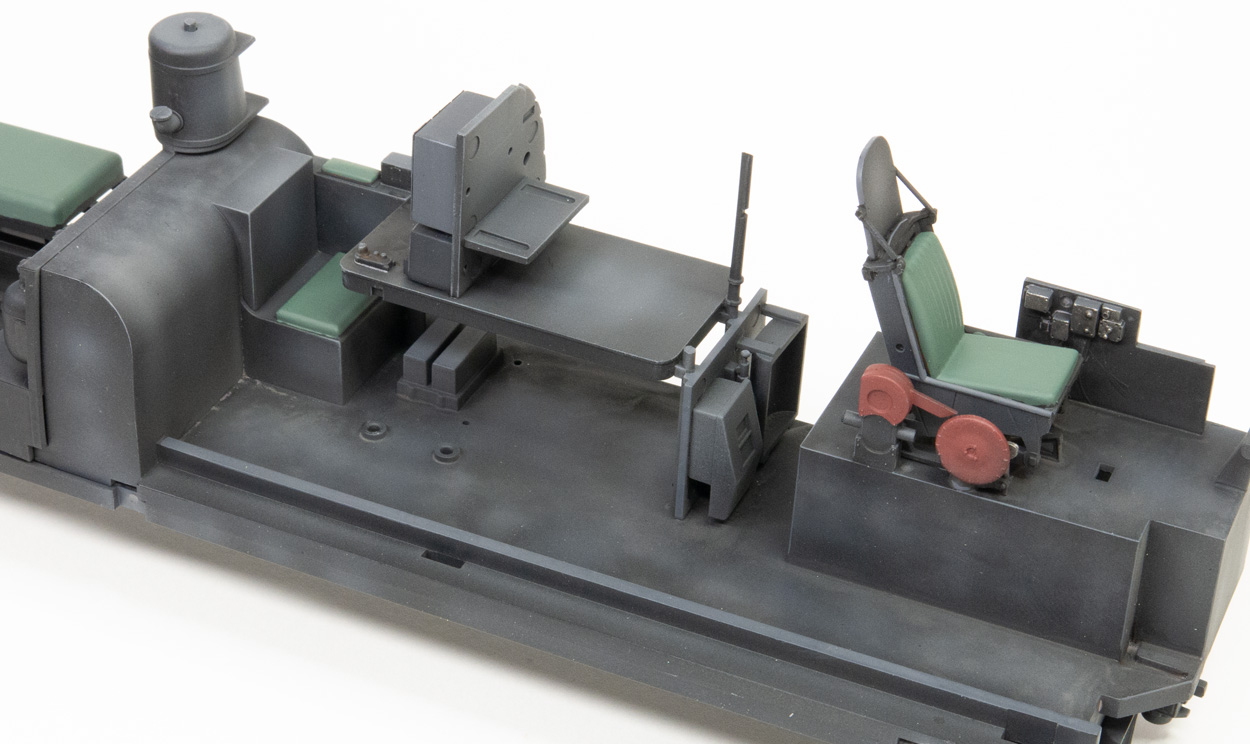
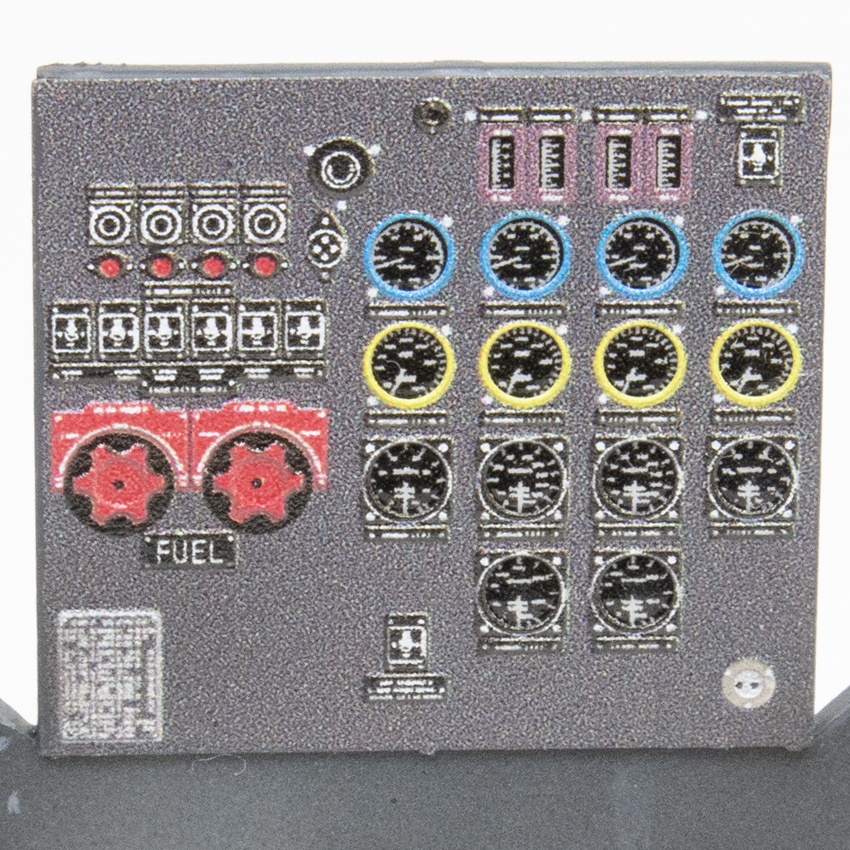
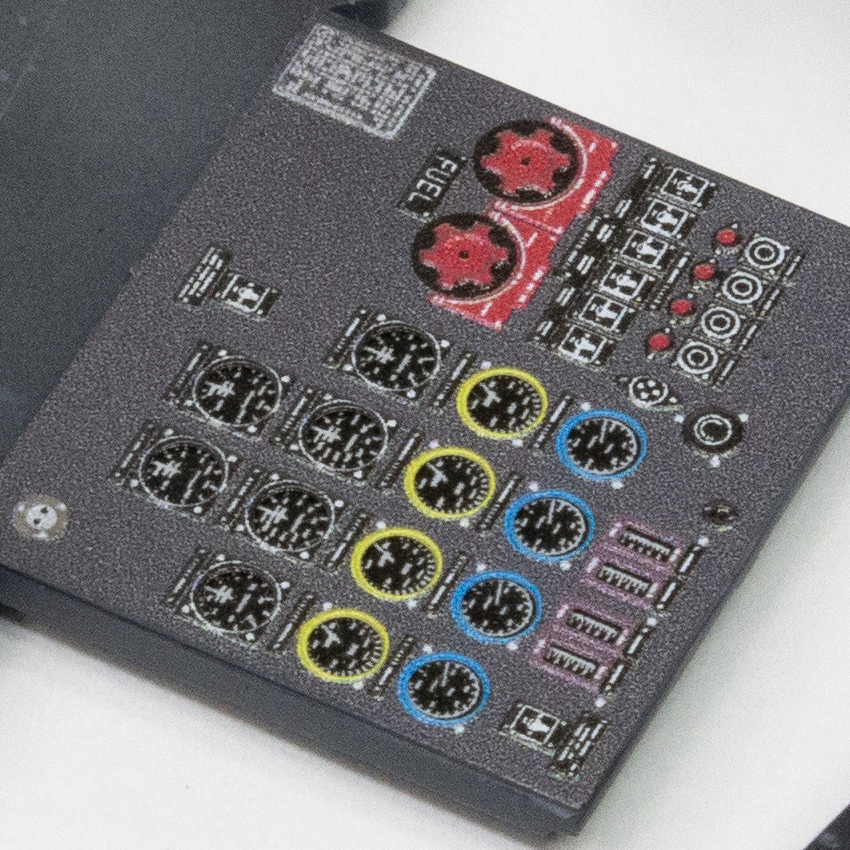
One area that I did concentrate on was the cockpit. Large and well-glazed in the real Lancaster, you can see a lot through the canopy of this 1/32 replica. Thankfully, the cockpit is nicely recreate by HKM, but even so, I thought it would be fun to add a little more in the way of fine detail. Those of you that have built models over the years may know that as well as the basic plastic kits that are oh-so familiar, you can now buy a whole host of add-ons, aftermarket accessories, that embellish what is supplied within the basic package. In this case, I used some very delicate metal parts that helped to detail the cockpit, seats and instrument panel, pre-coloured components both adding to the look of complexity, and cutting down on the time needed to paint such delicate and frankly tiny, features.

Internal parts of Dambuster model being assembled

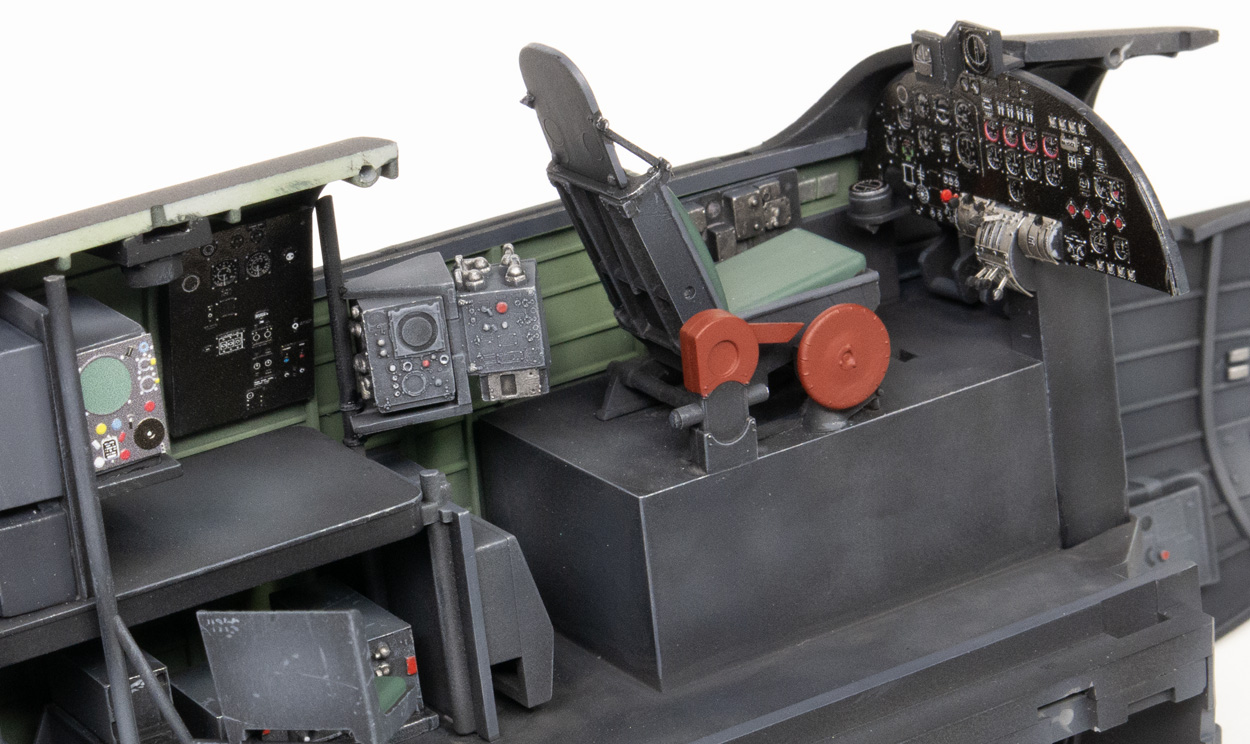
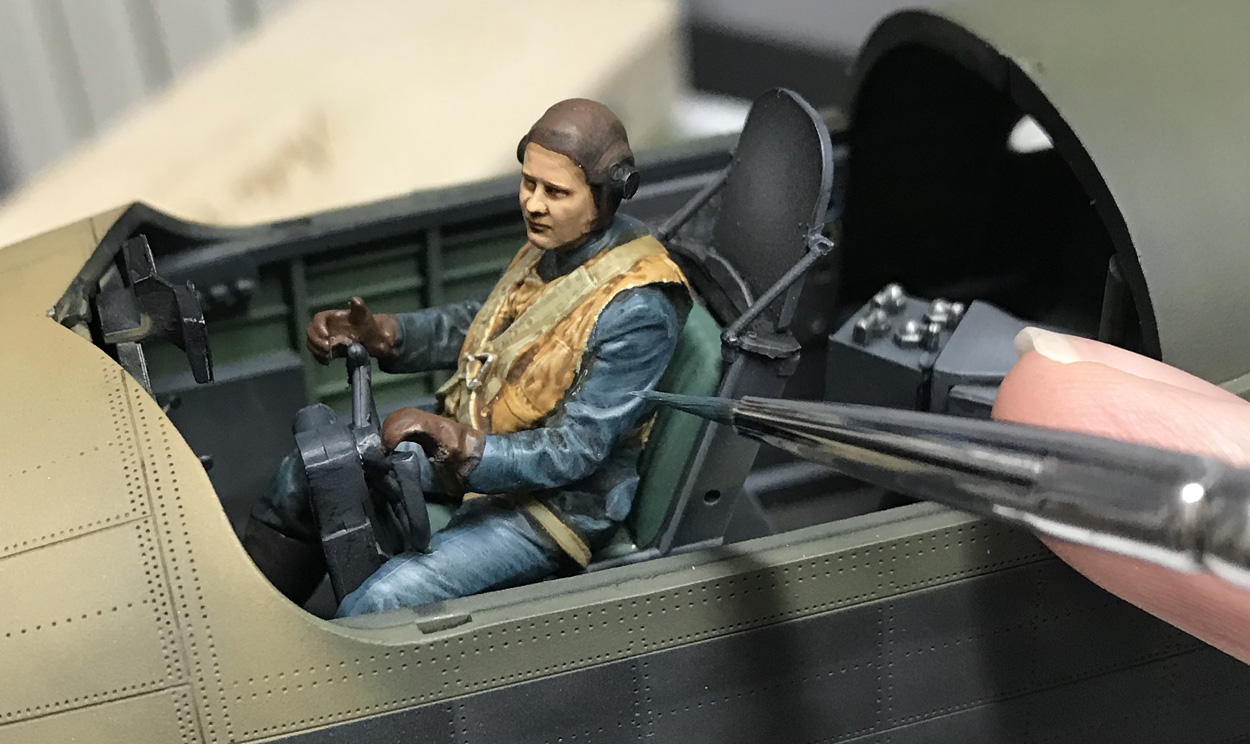
Other internal areas of the model needed less attention. Though there are two turrets on ED825, they are sufficiently cramped and dark, that little more than basic assembly and a coat of black paint was needed to capture their look in miniature. This also had a knock-on effect when it came to recreating the two gunners that would populate each one. Having no crew whatsoever to use as part of this build, I had to ask friends if they had any spares that I could build and paint for the cockpit and turrets. Though the pilot and navigator came from very new kits and were really nicely sculpted, those for the turrets came from a 1978 Matchbox kit of a Tiger Moth, so were less-than-impressive! Despite that, with a little corrective surgery (read ‘amputation’ as their legs were removed to allow them to fit…) and some careful painting, they actually worked really well, those cramped turret interiors, guns and heavily framed perspex bubbles, hiding a multitude of sins.

Close up of pilot in Dambuster model

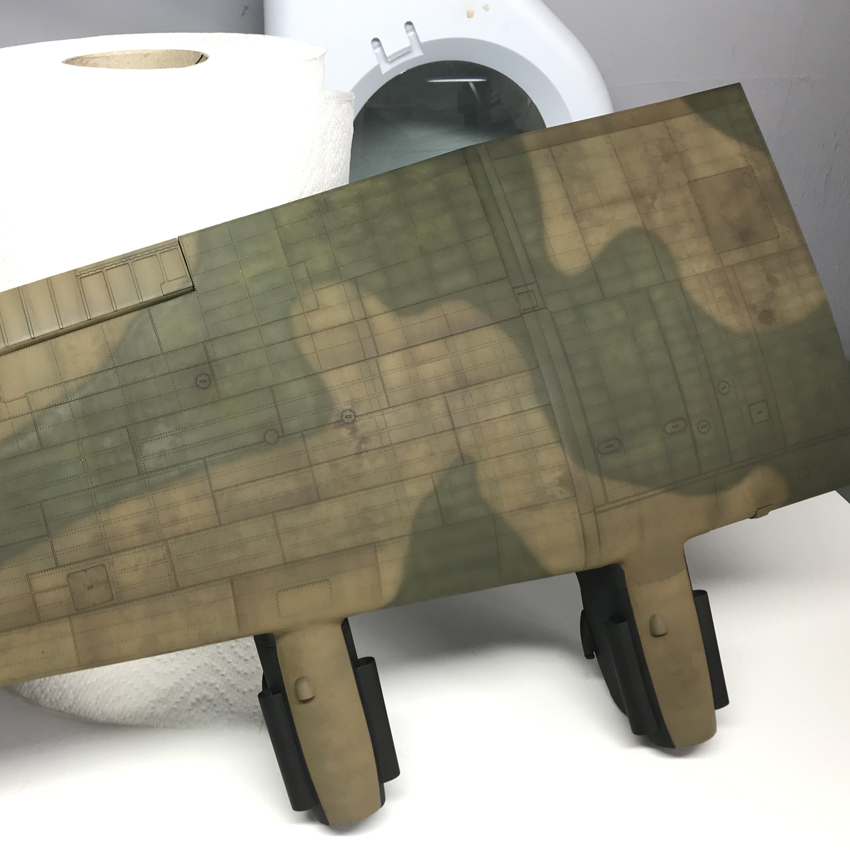
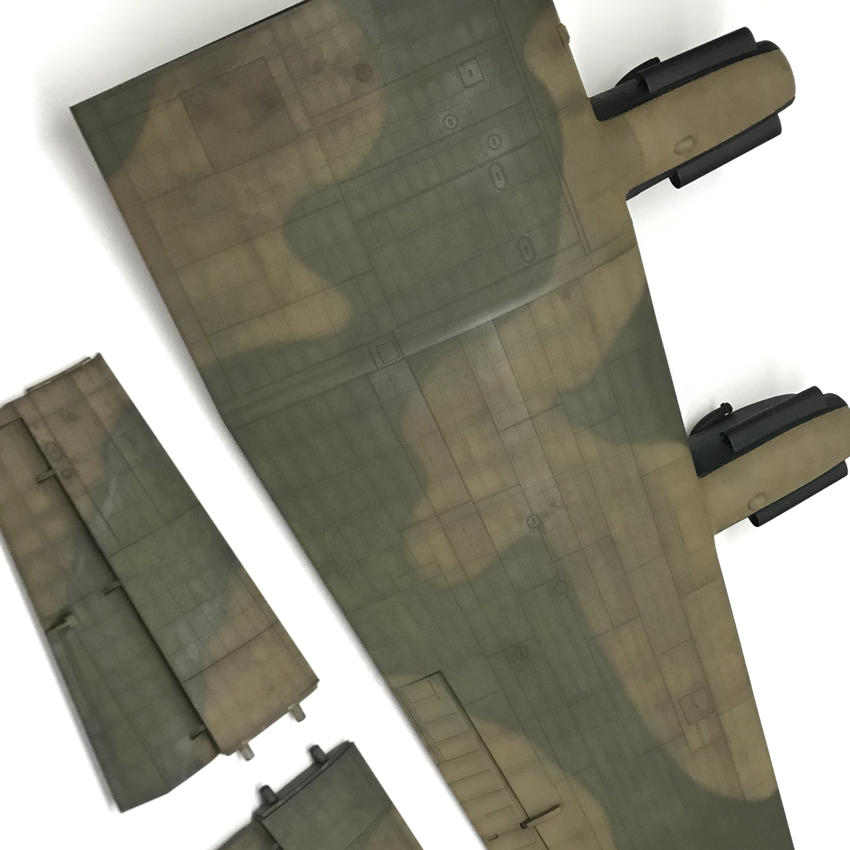
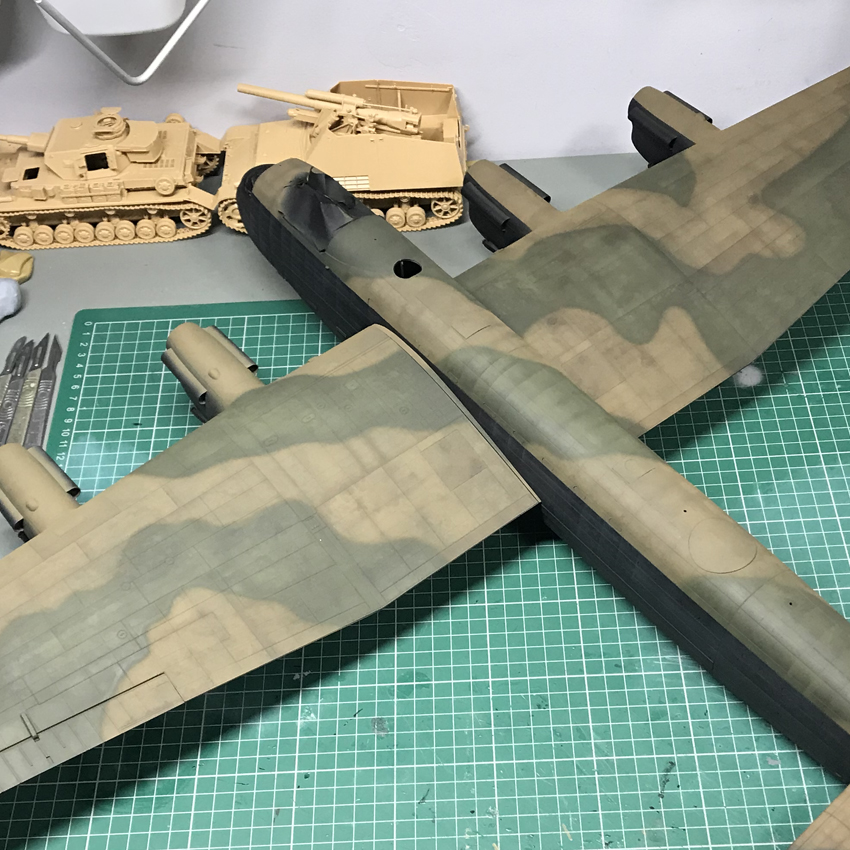
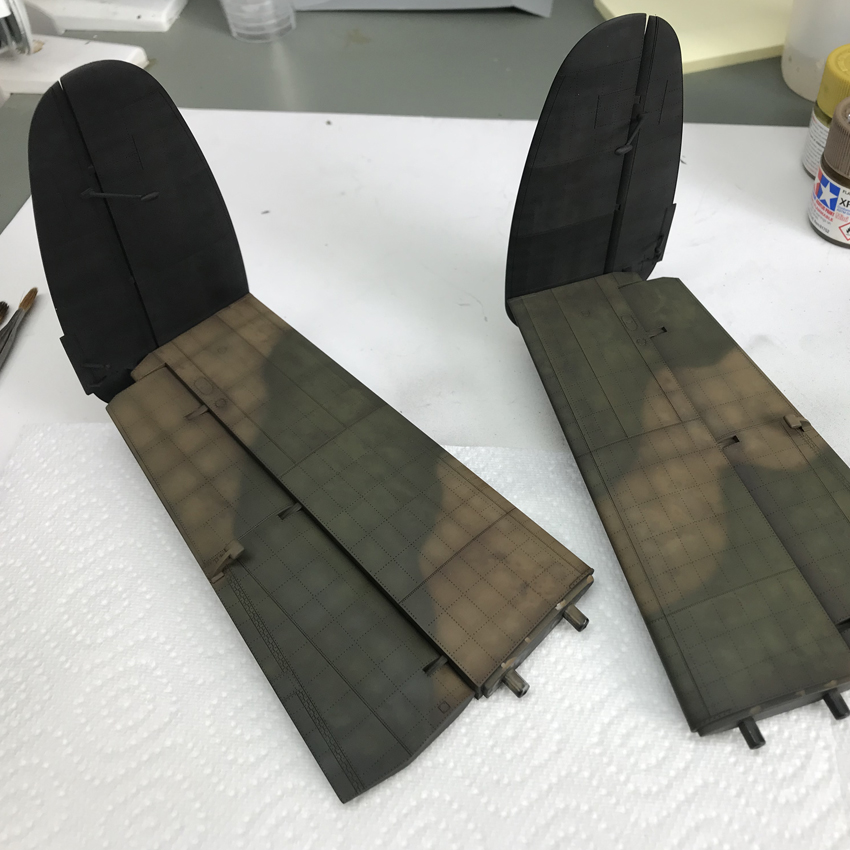
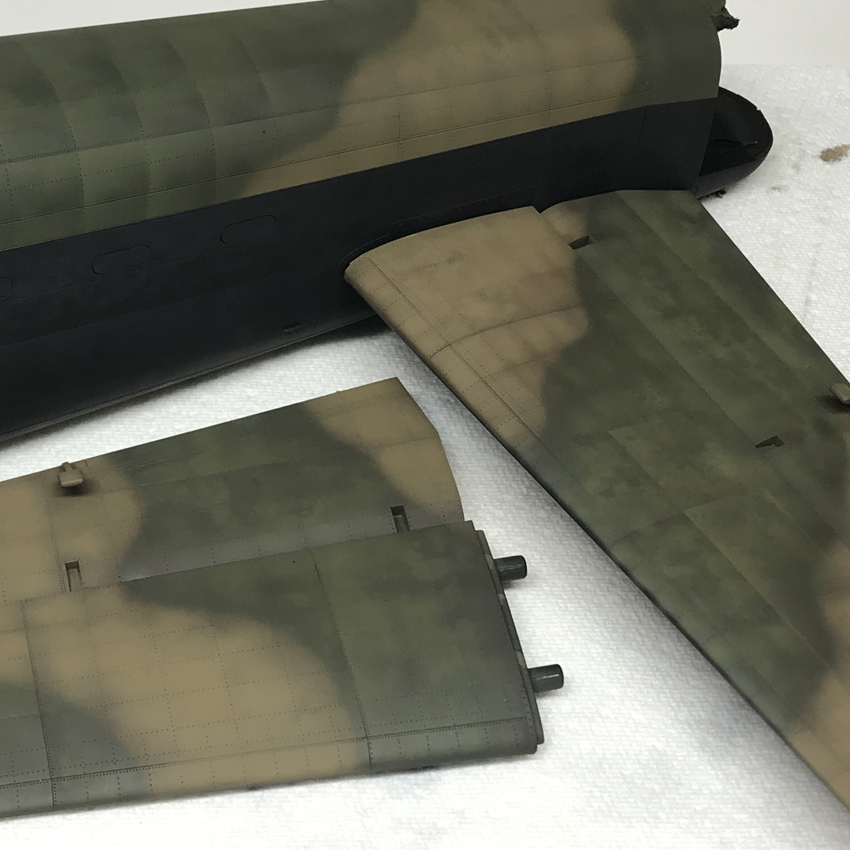
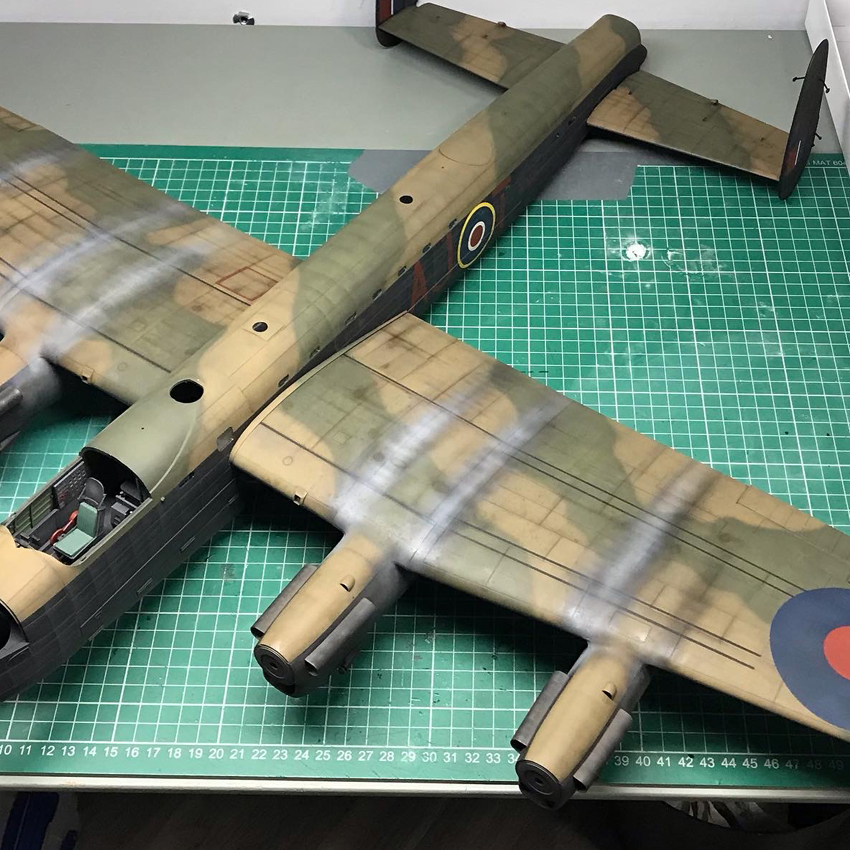
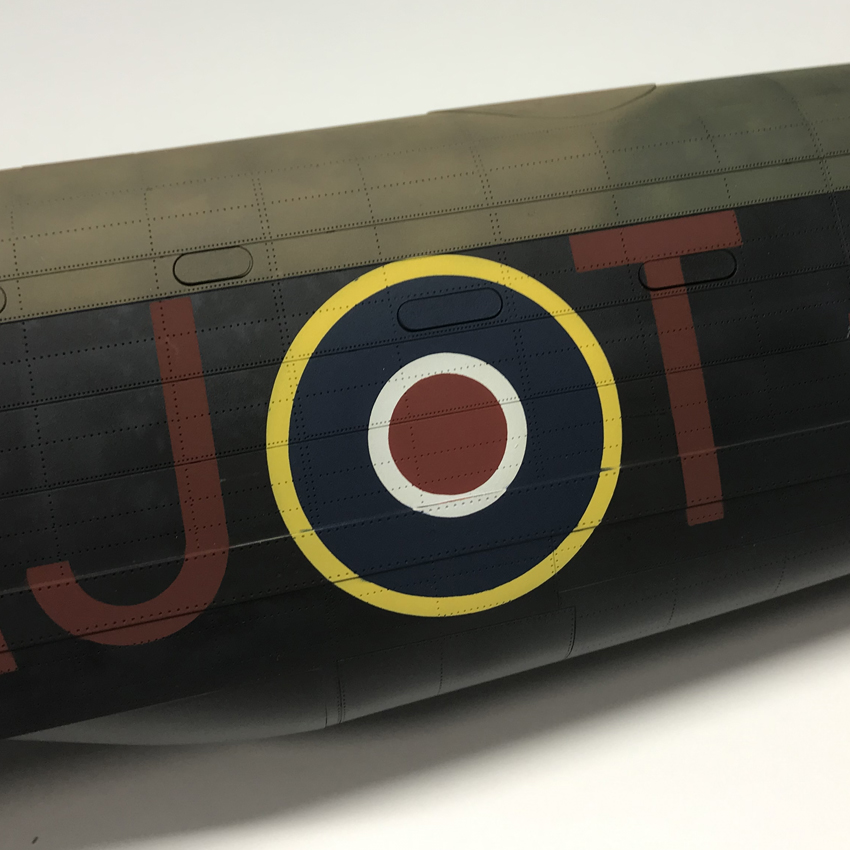
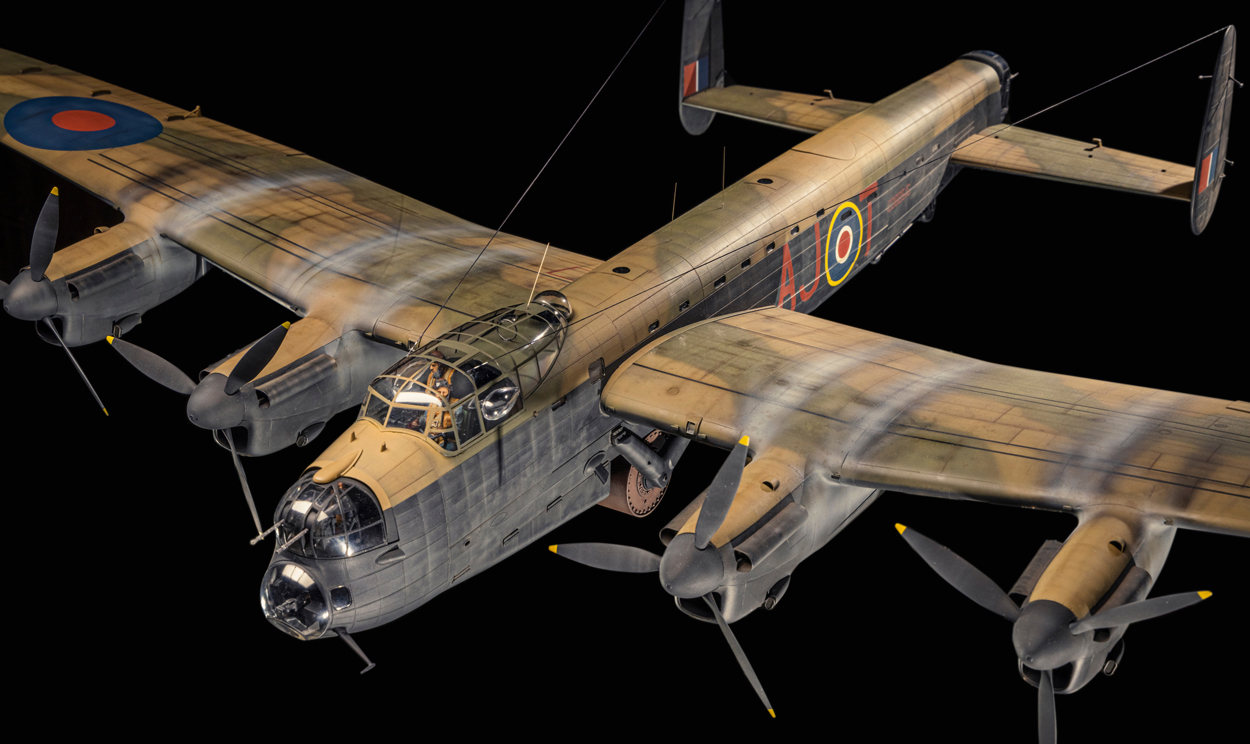
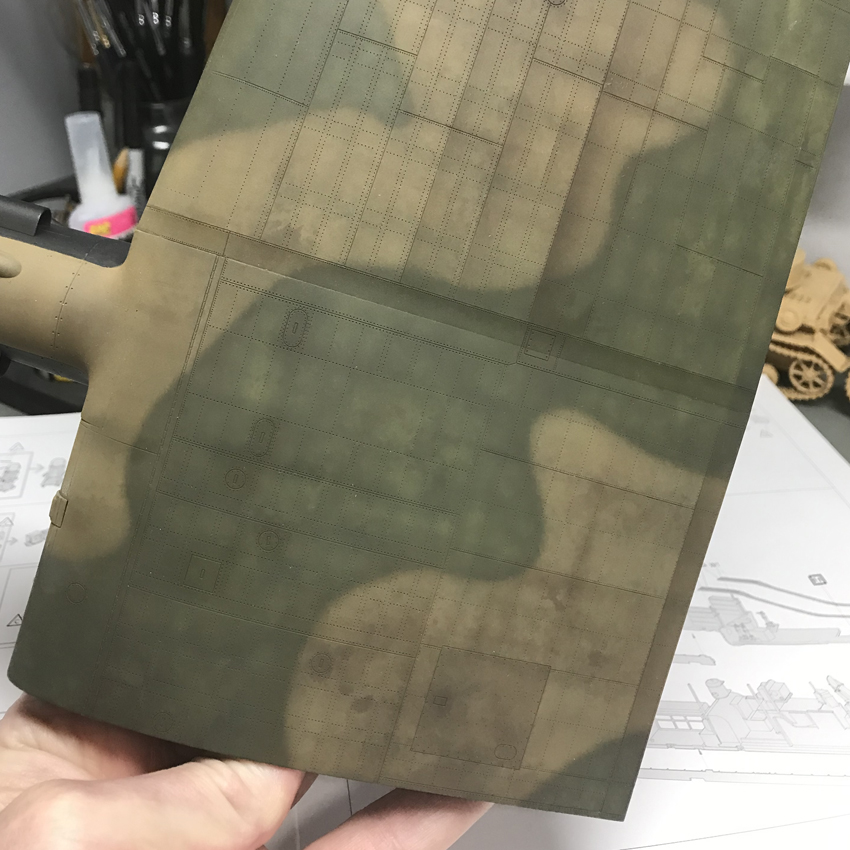
With major construction dealt with and the model all cleaned up to check for flaws, the camouflage finish could be applied. Sounding simpler than it turned out to be, the size of the model and some ideas that Graham wanted incorporating, had me scratching my head and then turn to a good friend for help. The first of those headaches, were the markings. ED825 is a very specific choice and though there are plenty of aftermarket decal sheets out there to deal with other Lancasters, there were none for this particular machine, even hunts for individual code letters, drawing something of a blank. That being so, I turned to my good friend Jonathan Mock, who just happens to be the decal designer for Airfix. He had already dealt with a number of Lancasters for that famous kit manufacturer, so he was able to draw up everything that I needed and then create custom self-adhesive masks that I could open up, apply to the model and then airbrush paint through to create perfectly rendered code letters, serial numbers and RAF Roundels and fin flashes. What that meant in turn, was that Zero West were not only getting their Lancaster to display, they were going to be the owners of one that was utterly unique, there being no other way to recreate this aircraft than with these custom masks, unless you decided to make your own. As it stands, there is no other 1/32 model of this aircraft, anywhere else on Planet Earth!

Close up of Dambuster model interior part
Close up of wing of Dambuster model
Close up of Dambuster model
Size alone made the painting of the model a logistical nightmare, simply holding it whilst I applied multiple layers of colour, being nothing less than a trial. And then there was the sheer amount of paint that I needed to finish everything. Model kit paints are supplied in small bottles, so it doesn’t take long to work your way through a number of them when painting something on this scale. For the black I turned to other materials in order to cover the surface, off-the-shelf car sprays taking care of the base layer of black that I needed in preparation for further work. Fortunately, weather was on my side as well, several days of sunny, albeit cold days, allowing the parts to be sprayed outside, rather than in the rather restricted confines of my studio. You see: it’s all about speed and convenience!
Dambuster model wing parts
Dambuster model being built
Close up of Dambuster model parts
The camouflage on a Lancaster, indeed on all RAF types, fighters as well as bombers, is distinctive in pattern. War department diktats, ensured that all similar aircraft types shared identical camouflage patterns at the same time, so you cannot simply paint a model in whatever you fancy! Fortunately, the Lancaster is well-documented, so its black, Dark Green and Dark Earth camouflage is easy to see and straightforward to copy, all colour here being airbrushed on using my standard stock of acrylic paints.
Dambuster model wings after being painted
Dambuster model partially built
Close up of Dambuster model
During the initial stages of planning for this build, Graham was rather explicit in his desire to see some ‘oil canning’, rippling of the skin of a Lancaster, that he felt would add to the character of the model. He’d seen this done on another model using putty in order to actually build the rippling into the surface features, but to me, that not only looked like it would take forever, it ran a serious risk of damaging the incredible surface detail that this model featured. Instead of modifying the surface of the fuselage in a physical way, I elected instead to use paint, trompe l’oeil effects recreating the effect of a rippled surface. This involved the meticulous making of individual panels, so that highlight could be sprayed over the upper surfaces over each one. As work progressed, you could see a fake effect that made you believe that the surface was rippled rather than being in reality, entirely smooth. Simple and effective, if not a little time-consuming!
Close up of pilots seat in Dambuster model
Remaining paintwork, really centred around the idea of weathering, those overlaid effects that help to imitate the idea of use. RAF bombers of WWII were heavily used and never stowed away from the elements. In normal times, machines would have a chance to be carefully maintained to perhaps look after their appearance, but no such luxuries were available to ground crews during the Second World War. Constant flights, maintenance to keep engines running, oil leaks, exhaust staining and all manner of other degrading factors –– not least of which was the British weather! — all conspired to make these machines look as appalling as possible. Graham had certainly been explicit in his desire to see this in place on the model, so that’s the route that was taken. Honestly, it wouldn’t really have made much sense to build a replica of such a well-know aircraft and paint it clean, anyway, so that was the route that I was happy to take, the result being a model that I believe captures the way ED825 actually looked, rather a stylised version that many have imagined over the years.
Dambuster model on model makers desk
FINAL THOUGHTS…
When I took this model on, I knew that it would be an extensive project that would take my skills and my workshop to the limit in terms of logistics and what was possible from the recreation of such a large aircraft, in miniature. Having now built it and seen the reaction to the finished model, I was certainly more than happy with both. Zero West’s beautiful collection of watches bear testimony to an incredible period in British aviation history, the cleverness of the scientists that that made the weapon possible and to the crews who so bravely carried it to their intended targets to be released to such devastating effect. My model now stands as a small memorial to Operation Chastise and the crew of ED825, a chance that I would not have had without the collaboration of Zero West Watches and my fellow modelmakers all of whom combined to turn a dream project, into reality. Thanks everyone!
Written by Spencer Pollard
Lancaster watches with Dambuster model above
THE FINISHED MODEL OF ED825
Dambuster model
Close up of gunner in Dambuster model
Dambuster scale model
Close up of 'bouncing bomb' on Dambuster model
Dambuster model from below
DB2 watch wrist shot with green rubber strap
The DB range of Dambuster watches feature rare metal from Lancaster ED825, one of the 19 bombers that flew during Operation Chastise.
Zero West – History on the wrist.
Flying Scotsman – Zero West Collaboration
LANCASTER BOMBER: ‘Right’ From the Start